Understand capabilities of IBM Bluemix DevOps services source code management for projects
1. Using the fork option to copy an existing DevOps project into a new project for enhancement
You may create a dedicated copy of a project in DevOps by selecting the Fork Project button, which will bring up a dialog for you to specify options and name the new project:

2. Understand the difference between a Commit and a Push and review and manage code pushes to the repository by project members
IBM Bluemix DevOps Services supports parallel development so that teams can efficiently collaborate on the source code of a cloud application. Developers work in isolation (workspace) until they decide to share their code with the rest of the team. In order for source code modified or added to a cloud application to be available to the entire team, it must be delivered to the project repository.
A set of hands-on steps are provided to show some key concepts of source code management.
a. Commit workspace changes to your repository
In IBM Bluemix DevOps Services, click EDIT CODE, then on the left pane, click the Git Repository icon.

In the Git Repository page, review the list of files in the Working Directory
Changes section. This assumes that you have modified some source code in your application before this step
In the Working Directory Changes section, enter the following comment:
o I added code for integration with Twitter
Optionally, you can add a story number in your comment: “I added code for integration with
Twitter as per story ####” and replace #### with a real story number from your project. Adding a story number in the comment will create a link between the change set and the story, permitting lifecyle traceability between code changes and work items.
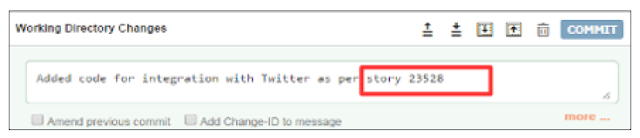
Select all the files and click COMMIT.

At this point, the files that you have changed in your workspace are saved into the Git repository but they are not visible to other team members.
b. Push your changes to the remote repository
To be visible to the whole team, changes from one developer must be pushed to the remote repository, the repository that all developers share.
In the OUTGOING section of the Git Repository page, click PUSH to deliver your changes to the main branch of the repository.
Your changes are merged with the code in the shared repository.
3. Verify the integrity of code delivered to the repository with a build
To support continuous integration, the code delivered to the shared repository must be verified with a build. The success of a build ensures the integrity of the source code.
a. Configure a build stage
IBM Bluemix DevOps Services supports manual build and automated build through the Delivery Pipeline. In a pipeline, developers can add a stage to complete build jobs.
On the upper right corner of the IBM DevOps Service project page, click the BUILD & DEPLOY button.

When the pipeline page opens, click ADD STAGE to create a new stage.

On the INPUT tab, give the stage a name (BuildStage) and make sure that the “Automatically execute jobs...” option is checked.
On the JOBS tab, click ADD JOB, and select Build for the job type and Simple for the builder type.
 Click SAVE. Automated build is now enabled for your project, but the stage can also be used to start a build manually.
 b. Build the cloud application
A stage associated to a build job is useful to verify the integrity of the source code. It can be used to build the application on demand, or to automatically build the application each time a change is delivered to the shared repository.
To start a build of the application manually, click the Run stage button on the upper right corner of the stage. The build starts and the stage indicates progress.
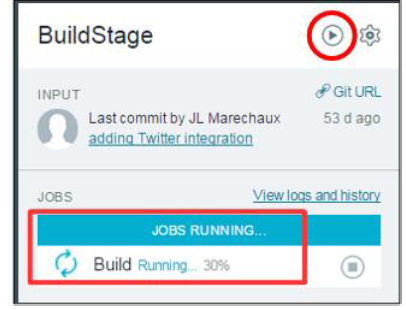
When the build completes successfully, the status is updated. The View logs and history link gives access to more details about past builds.

Click the View logs and history link on the build stage. You have access to a lot of information about past builds in your project, such as: build history, builds status (success or failure), build duration, build logs, and artifacts included in a build.

1. Using the fork option to copy an existing DevOps project into a new project for enhancement
You may create a dedicated copy of a project in DevOps by selecting the Fork Project button, which will bring up a dialog for you to specify options and name the new project:

2. Understand the difference between a Commit and a Push and review and manage code pushes to the repository by project members
IBM Bluemix DevOps Services supports parallel development so that teams can efficiently collaborate on the source code of a cloud application. Developers work in isolation (workspace) until they decide to share their code with the rest of the team. In order for source code modified or added to a cloud application to be available to the entire team, it must be delivered to the project repository.
A set of hands-on steps are provided to show some key concepts of source code management.
a. Commit workspace changes to your repository
In IBM Bluemix DevOps Services, click EDIT CODE, then on the left pane, click the Git Repository icon.
In the Git Repository page, review the list of files in the Working Directory
Changes section. This assumes that you have modified some source code in your application before this step
In the Working Directory Changes section, enter the following comment:
o I added code for integration with Twitter
Optionally, you can add a story number in your comment: “I added code for integration with
Twitter as per story ####” and replace #### with a real story number from your project. Adding a story number in the comment will create a link between the change set and the story, permitting lifecyle traceability between code changes and work items.

Select all the files and click COMMIT.

b. Push your changes to the remote repository
To be visible to the whole team, changes from one developer must be pushed to the remote repository, the repository that all developers share.
In the OUTGOING section of the Git Repository page, click PUSH to deliver your changes to the main branch of the repository.
Your changes are merged with the code in the shared repository.
3. Verify the integrity of code delivered to the repository with a build
To support continuous integration, the code delivered to the shared repository must be verified with a build. The success of a build ensures the integrity of the source code.
a. Configure a build stage
IBM Bluemix DevOps Services supports manual build and automated build through the Delivery Pipeline. In a pipeline, developers can add a stage to complete build jobs.
On the upper right corner of the IBM DevOps Service project page, click the BUILD & DEPLOY button.

When the pipeline page opens, click ADD STAGE to create a new stage.
On the INPUT tab, give the stage a name (BuildStage) and make sure that the “Automatically execute jobs...” option is checked.
On the JOBS tab, click ADD JOB, and select Build for the job type and Simple for the builder type.

A stage associated to a build job is useful to verify the integrity of the source code. It can be used to build the application on demand, or to automatically build the application each time a change is delivered to the shared repository.
To start a build of the application manually, click the Run stage button on the upper right corner of the stage. The build starts and the stage indicates progress.
When the build completes successfully, the status is updated. The View logs and history link gives access to more details about past builds.
Click the View logs and history link on the build stage. You have access to a lot of information about past builds in your project, such as: build history, builds status (success or failure), build duration, build logs, and artifacts included in a build.


0 comments:
Post a Comment